Monday, December 31, 2018

Huckleberry Village #152

In Genesee county there are over 11,000 acres of woods, water, trails and beaches that are under the control of the Parks Department.  One of the areas of the park is named Crossroads Village.  Crossroads Village is a collection of 19th Century buildings - and a working railroad.   You can visit these buildings for a small fee.  And since I'm on the railroad kick, I had to at least try to get an image of another working steam engine.  And time is a' wasting away as this is the last weekend for 2018 that the train will be in action.  And the train only runs from 5:00 PM and the sun sets at 5:07.  You get the idea?
I was out a few days earlier, in the wind, rain and dark and didn't do so well.  But in that darkness, I did figure out a few things.   As the famed philosopher Yoda said, "the greatest teacher, failure is".
So, aside from gaining some knowledge I also gained 5 minutes of daylight by returning two days later.  And the weather was much better.
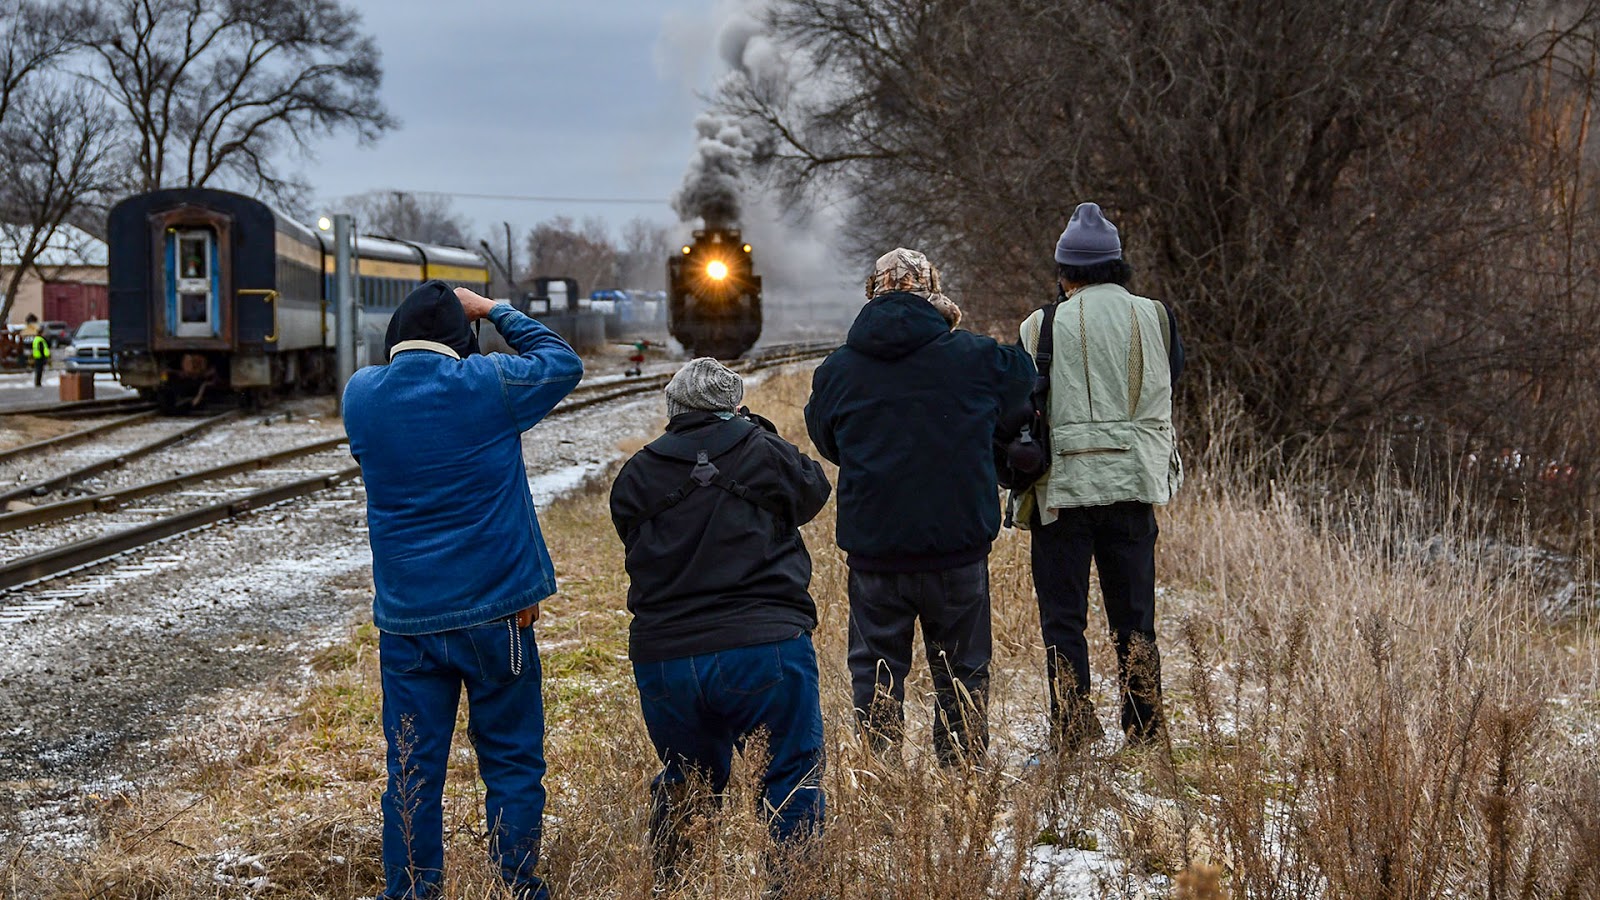
And back to the story:  During the holiday season between Thanksgiving and New Year, the Huckleberry Railroad departs Crossroads Village a few times a night in 50 minute intervals.
There are multiple trains operated by the Village, two to three according to their website.  The train I saw was #152.  The #152 is just out of being renovated.  The #152 was built in 1920 by the Baldwin Locomotive Works in Philadelphia as a 4-6-0 for the Alaska Engineering Commission.  The original job for #152 was to help build the Alaska Railroad.  After the completion of the Alaska Railroad and subsequent stops in California and Oregon, the Genesee County Parks and Recreation Commission purchased the engine in 1975.  After a year of restoration, the train began service in Crossroads Village.
This image was taken at the midpoint of the of the ride for the paying riders.


ISO 6400, f/5.6, 1/250 sec, 200 mm, Manual, Auto ISO
NIKON D500 Ver.1.15/18.0-200.0 mm f/3.5-5.6


I used my recently discovered set up of using MANUAL mode with Auto ISO on.  I wanted to keep the speed at 1/250 and the aperture at 5.6.  I wanted to keep the trees relatively in focus.  I checked my ISO prior to the train entering view and I saw it would be 10k or lower and I was OK with that.  In this case for me, the method works.  This train chasing thing could become a habit.

Saturday, December 29, 2018

Using Auto ISO - and the Aviation environment.

I've always stayed away from auto ISO settings on my DSLRs.  There are some things that still draw me back to the 35mm days.  Could be I also didn't totally understand what limits or controls I could set.
I'm getting better at exploring higher ISOs than the 100, 200 and 800 that I was used to back in the day.  At the air races, I started one day at ISO 800.  Who was that guy?
I've gone through the total priority cycle.  That is I started at AUTO, then went to PRIORITY, tried SPEED and did a lot of time in MANUAL.  I'm most comfortable in PRIORITY.
The great part about the modes is they really allow you to shoot in AUTO with restrictions.  We'd all like to shoot MANUAL, just to say we can.  I can.  But I've missed shots.  And I don't want to say I shoot AUTO.
But command of the camera, the ability to modify the camera settings, quickly if necessary, to suit our situation is what we're going after.
When I'm shooting the model trains, I use MANUAL.  Simple reason is I have plenty of time and the environment never changes.  It's indoors.  The subject doesn't make any unexpected moves.  I get to review the shots.  If I need to re-take any images, it is doable.
When I'm shooting landscape, I use APERTURE PRIORITY.  I've found that I'm getting my best results with aperture settings higher than f/11 and more in the range of f/5.  Again the environment isn't changing too much or too fast.  I generally have an idea of what the speed is going to be and as long as it is over 1/250 I'm OK.  (1/250 will cover my 18-200 lens at max reach for simple speed guidelines.)
At the start of 2018 that was good enough for me.  Ah, the simple life.
In 2018 I had an 'expanding' year.  I found the fun of wildlife (Birds and Birds in Flight) and air races/shows.  While I've flirted with both subjects in the past, this year was time to up the game.
For the wildlife and BIF I shot MANUAL and APERTURE.  I missed too many shots (1) with MANUAL.  APERTURE was fine, but I think think I over planned and may not have had the best combination of APERTURE and ISO to get the best colors I could.  Area for improvement.
For aircraft in motion, both flight and ground operations, I have to get better.  I got lucky this year, but could have been much better.  Aircraft to me is probably the most difficult to get right because the action happens so fast, and the environment could change quickly and dramatically.  The subject moves from a cloud background to blue sky, then fly low over the ground.  No time to change stops and speed.  Oh yea, and there's a prop blur limitation.  Not that this is a problem, but a challenge.  
I need to solve the aviation environment.  If I can do that, all other environments will be controllable as well.
For the Aviation issue, the Exposure Triangle:
I need to shoot with SPEED priority.  If the subject were only jets, than speed is not a limiting issue.  But with props on both on fixed wing and helicopters, speed is the primary consideration.  From what I've seen, prop aircraft in flight should be less than 1/1000 sec and on the ground start at 1/80 sec and slower.  That takes care of the shutter speed side.
Aperture control is a personal thing with me.  As mentioned earlier, I like a nice open lens.  I'm a firm believer in reducing as much diffraction as possible.  I'd like to keep some control.  Shooting an aircraft in flight doesn't require a lot of DOF, especially if shooting with a sky background.  Unless there are multiple subjects.  I found f/5 and f/6 to do real well.  I'd like to set it and forget it.  That takes care of the aperture side.
Remaining is the ISO side.  Most cameras come with SPEED and APERTURE priorities.  There isn't a ISO priority.  Or is there?  Apparently with my Nikons, you can set the ISO to float with the SPEED and APERTURE fixed.  Why didn't I think of that?
I've found out that if you sent the camera mode to MANUAL and the ISO to AUTO, the ISO will float.  It is about that simple.  I can maintain some control over the ISO with the ISO - AUTO settings.
I think this will be a very cool setup for the aviation situations.  With the use of the command dials, I can change SPEED and APERTURE as I normally would in MANUAL.  Quickly.  And that completes the triangle.
This will be an awesome tool.  Will be looking forward to trying this out.
Another tool I'm looking to use is a neutral Density Filter.  I have a variable NDF, not a real good one.  I'd like to keep the filter at one piece of glass, but buying multiple filters is $$$$s.  First thing I need to do is get comfortable with the filter I have.  I have all winter, and when the snow hit the ground there will be lots of light to work with.  I also need to read more reviews.  If I do go with single, fixed filters, I need to figure out which one or ones to get.
Fortunately have time to work some of this out.  But not as much time as I thought.  The air races are in September.  However, I've committed to an air show in South Carolina in late April - about the time I'll need to thaw out from the Michigan winter.

Thursday, December 27, 2018

Point Iroquois Lighthouse at Dusk

In May of 2011, we took a short trip to the UP.  We were staying in SSM as usual.  One of our day trips was to head up to Whitefish Point.  On the way to Whitefish Point is the Point Iroquois Lighthouse.  Point Iroquois is where the western end of the St. Mary's River and Lake Superior intersect.  The light was to guide Great Lake freighters going downbound to the Soo locks.
The original lighthouse was completed and started operation in June of 1856.  In 1870, the original lighthouse was torn down and the current lighthouse was completed and in operation.  This was the time of the Great Lakes industry boom.  The Great Lakes was the place to be.
The tower height is 65 feet.  The original light was a fourth order Fresnal with a signal visible to 13 miles.  The current lighthouse was in operation for 93 years until it was deactivated in 1963.
In the early 1990's, the entire location was renovated.  When we visited, the grounds and house were in excellent shape.
Getting back to the day trip, because this was taken at dusk.  We stopped at the lighthouse early in the morning and enjoyed the clear view and fresh lake air.  After our stop here, we headed up to Whitefish Point for a few hours.  From WFP, we were off to Tahquamenon Falls for a few hours.  (The days are long at this time of year.)  From the Falls, we headed back to the Soo.  While we were passing Point Iroquois for the second time of the day, we saw there were no other visitors and the sun was setting behind the house.  Excellent photo opportunity.
This is a three shot HDR image.  I've played with this scene over the years and from what I can see I always tried to 'over' HDR it.  This shot on its own stands up well.


ISO 400, f/5, (1/15, 1/60, 1/250 HDR), 24 mm
NIKON D90/18.0-200.0 mm f/3.5-5.6
HDR - Photomatix 6.1.1

No halos on the roof line.  There is a slight halo between the left chimney and tower, but not enough to really annoy me.  This is exactly what I want HDR to do for me these days, just balance the light.
But.
It is just another lighthouse photo.  There are lots of these on hundreds of post cards.
Dare to be different.


That's different.

Grand Trunk Western Logo - Restored

This railroad fascination has a hold on me.  Ha.
I'm having fun reading up on the locomotives I have pictures of, and getting a glimpse of the history.  We'll see where it goes.
In Grand Haven, the PM #1223 is on display.  I have a few shots posted here
At the display is a restored caboose with the Grand Trunk Western logo painted on the side.  It is really nice.  Too nice.  I mean a caboose needs to look used.  The restoration looks so good, looks like restoration was just completed.  An hour ago.  No bird evidence anywhere.
The logo to me is very interesting.  I'm guessing the leaf is Maple, therefore Canadian.  Which makes sense.  The GTW is and always has been part of the Canadian National Railway in some form.  The GTW was originally set up for rail access from Canada to Chicago, by way of Port Huron and Detroit and points in between throughout mid-Michigan.
This is the logo as it appears on the caboose as of a few weeks ago.


And while that may look OK, it doesn't do much for me.  I need some form of artistic license.


This would be a lottery project for me.  I would find a caboose somewhere, not in public use, and get the caboose art.  Much like barn art.  Just get the logo restored and have the wood moved to a large room.  Or maybe the lottery 'fun' project would be to start a museum with caboose art.

Sunday, December 23, 2018

#1225 - Up close. (Hint: It's Large!)

If I ever need a image that fills the screen, this is it.  I can't say how close I was to the tracks at the time.  I'd hate to have broken some federal law that I'm ignorant of.  Or I could say this is a remote shot.  Whose to say?  Wow.


ISO 200, f/5.6, 1/160 sec, 36 mm, Aperture Priority (EC -1)
NIKON D500 Ver.1.15/18.0-200.0 mm f/3.5-5.6

There are many things to like about this image.  So I'll start with the one that bothers me.  Just a little bother.
The 1225s are a bit blurry.  I'd say that is a DOF issue, but that might give a clue to how close I was.  But I'll go with this.  Due to laws of Relativity, the front of the train was moving faster than the 1/160 sec could capture without blur.  The rest of the train was OK.  I can live with that answer.
I like that the entire frame is filled.  There is smoke and train - and just the smallest amount of sky due to the boiler shape.  On the downside of filling the screen, I have to keep the original format.  I like the 1920x1080 because it fills my monitor.  The 1920x1280 doesn't fit exactly right.  Oh well, redo?
I like that there is enough angle to see all the engineering.  Pipes, bars, wheels and tubing.  Does it get any better?
I like the engineer hanging out of the cab.  Just enough for some definition, but not enough to hold your gaze.  Just like in the movies.

Saturday, December 22, 2018

Chasing the Santa Express - PM #1225

One of the fundamental flaws I have is when I get a new toy, I just want to play with it.  And with the gift of the trains in the last week I've found that new toy.  Today, a few friends and I chased the Santa Express.  The Express is pulled by the PM #1225, same as the Northern Express.  The Santa Express does not follow the entire route of the NE, maybe going 50% of the way.  However, it made it far enough out of Owasso to make our day very eventful.
We started the day in Owasso, checking out the museum where the SE started.  We were there early enough that we could chat with some of the volunteers getting the train and cars ready to go.  And what a show we saw.


Bob and Rohn

Yes, it was cold.  I used gloves most of the day.  For some reason when you wear gloves, the shutter release button moves its position.  I need to let Nikon know about this.
Close to an hour before the SE scheduled departure, the train yard came alive.  We weren't the only ones out for the day, not to ride the train but to photograph it.


No problem, you're not in my line........

Actually everyone out there was playing by the rules, no one was hurt by interfering in one of my shots.
The most interesting sight of the morning was 'fueling' of the #1225.  I never think of these things until, well, I see them.  The #1225 runs on coal.  Lots of coal.  The #1225 needs roughly a ton of coal for every 15 miles to generate the steam required to move the engine and its cargo.  It never occurred to me to ask, well - how is that coal loaded?  Had I asked the question, this would be the answer.  You get some help.


Loading coal on the #1225.

With the train fueled, an intricate ballet of machinery started.  The engine need to exit the yard ahead of the passenger cars.  While the engine and cars were moving around, the peanut gallery would offer guesses as to what would happen next - and we were never right.  We did know which directing the train would end up leaving Owasso, and with that information we were never out of place.


The A-Team

After the train left the yard and staged itself for the passengers, we took off for intersections of road and rail road.
Our first stop was at Carland, where Santa was waiting to meet the train.  I have some images from there, but nothing exciting.  But our second and last stop of the day was at an off the well worn track where a dirt road crossed the tracks.
For me, this was the location of the day.  All that was missing was some loose snow to complete the effect.  Other than that little item, perfect.
I have two shots that I really like.  The first on, which will be posted soon is a little more creative in that there is motion involved.
This one is a little more standard,  The whole series from this location is good, but this is the best of the bunch for me.  No phone poles.  Correct era passenger cars.  All the steam plum.  Headlight not blown.  Awesome.


ISO 200, f/5.6, 1/400 sec, 50 mm, Aperture Priority (EC -1)
NIKON D500 Ver.1.15/18.0-200.0 mm f/3.5-5.6

I was sitting on the road on top of some light snow, with all the joys that brings.  All things considered this is probably one of the better shots I've taken.  The scene was right, the ISO was right, the shutter speed was right and the frame was right.  Very few times does that ever happen for me.

Friday, December 21, 2018

#1223 in Grand Haven

While looking for information on the PM 1225, it turns out that a train of the same series exists in Grand Haven.  I know this, and I've seen the train on display.  Grand Haven has a lighthouse that I've been to a few times - and the train display is close by.
Photo note, this was very flat sky day.  I took this image on the D500's test run a few weeks ago.  This was taken in Aperture priority mode.  In order to battle the flat sky, I shot with -1.67 exposure compensation.  That's pretty low for me, I usually don't drift south of -1, but sometimes you gotta do what you gotta do.
Back to the train:  


Essentially, the #1223 and #1225 shared similar paths and dates.  After 'retirement' in 1951, this train was saved from the scrap yard in 1960 to be a display at the state fairgrounds in Detroit.  In 1981, the train was moved to Grand haven where it sits today.  The train is cosmetically restored - and looks pretty good.
From of the cars on display:


And the train display:


ISO 100, f/11, 1/80 sec (Aperture Priority -1.67)
NIKON D500 Ver.1.15/18.0-200.0 mm f/3.5-5.6

Looks in pretty good shape for being out int he elements.  I'm fairly certain this train will never move again, but you never know.
This train learning experience has been a fun journey.

Thursday, December 20, 2018

#1225 In Ashley

At the end of the Northern Express run is the village of Ashley, MI.  The Express will stop in a position to allow the passengers to disembark over a concrete, solid road.  When all the passengers have left the cars, the train will (very) move back to clear the intersection.
While this is in progress, all the photographers tried to get close to the engine, only to be held back by 'security'.  I overheard one photographer say that this was the first time this policy was enforced this year.  But was fun time and a chance to chat with fellow shutter bugs.
While moving in a reverse direction at a slow pace, there was steam everywhere.  Great visual.  Not so much for image file.
Talk about flat light.


ISO 1000, f/5, 1/1250 sec, 20 mm
NIKON D500 Ver.1.15/18.0-200.0 mm f/3.5-5.6

First, stuff on the right has to go.  The branches and the objects just in the clearing steam.  I'll take whatever I can to get some definition in the flat parts.
I have some options.  I could go B&W?  Single image HDR to get definition?  Paint?
If I go B&W, my go to set of filters are NIK - when it was free.  I use the Silver EFX Pro 2 and the one that caught me was based on the Film Noir presets.  I still like another preset used on a model train - but I don't want to get caught in a rut.  These steam trains remind me of days gone past and so B&W is a fit.


That looks good to me.  Looks like what I'd imagine Detroit or Saginaw looked like in the late 40's and early 50's.
I tried a single image HDR and what I liked most was a B&W take.  This image took it in that category.
But now that we have a painting option, how would that look?  Again, due to the whole rut thingie wanted to try other options/looks.
What wound up as the paint option started as a sketch search.  Although there are very elaborate paint options, I still think for my purposes less is more.  The Carland Elevator Paint is probably more that what I originally wanted to do, but in that shot it worked.  All of that subject was cold to me.  And that effect worked there.  This is different, it needs to be more 'real'.
So I wanted to go with more of a drawing look.


That pretty much nails what I was looking for as an option when nothing else works.  I like that  one all day long.  Looks like it belongs as a story board for a Spaghetti Western.  That's a far way from Michigan.
A few years ago, I introduced HDR to the photo club of which I am a dues paying member.  Caused a lot of ruckus.  I can laugh at it now.  I stress dues paying, so they couldn't kick me out.  It all worked out.
In January's club meeting, I'll show this and the Carland image.  That'll be fun!

Wednesday, December 19, 2018

Carland Elevator - Paint

I really like the Carland Elevator image.  Problem is, as much as I like it, there is no zip, zang or whatever to make it stand out. The sky is way too bland and flat.  The subject, unless you like yellow, old machines and an optically challenged blue building it probably isn't for you.
I always liked doing something different with images.  Plenty of great photographers out there, I'm not going to compete.  But I've found my niche where I'm happy.  But this year, for the trains, planes and nature I've gone straight photograph.  And I'm real happy with it.  When I get more comfortable with these subjects, I may stray to the HDR/contrast look that I like.  Who knows the future?
Back to the present and the Carland Elevator.  This image wasn't just a 'snap'.  I saw the image in my head - and worked to get it.  It just didn't work out.  Stuff happens.  No participation trophy.
So usually when I get a shot I like, but can't do much with it - I'd go HDR.  See what happens.  And I did with this, but the sky was so flat - nothing came out.  Except the halos.
Where do you go when HDR doesn't work? - and you want to keep the shot.  Now I have another option.  Let's paint it.
And this is what I have:


How do you make an old, cold chunk of metal older and colder?  I'm not crazy about the trees on the right, but I can live with it.  The sky ain't pretty, but it ain't flat either.  In the end, I like how this was 'saved'.  It makes the screen saver list.


Monday, December 17, 2018

PM #1225 Rolling By - Part II

I have to admit, this past weekend's chase of the PM #1225 was a lot of fun.  I had very high, for me, expectations for two or three shots.  The first PM #1225 Rolling By is a case of not seeing the forest because of some damn tree in the way.  And actually, the same could be said for the Chasing the Polar Express image.  There is a shot previous to that one that looking again is what I would call better.  Not enough to re-post, but.....  Like a kid with a new toy.
So I'll call the first Rolling By image a learning lesson.  I had to remove too much of that phone pole.  It still bothers me.
Looking again, I what I would consider a better image.  That is, there was less to remove at a cost - that is the engine is a smaller part of the overall environment.
I'll go with this one.


ISO 1000, f/5, 1/3200 sec, 52 mm
NIKON D500 Ver.1.15/18.0-200.0 mm f/3.5-5.6

Where is the snow when you want some?

Sunday, December 16, 2018

Carland Elevator

Carland, MI.  Yes, it is a small something in Michigan.  Back in the day, Carland was a stop along the Owosso & Big Rapids Railroad established in the mid-1880s.  Carland was a lumber town that flourished when lumber was plentiful, and...   Well, it is now surrounded by farm land.
There are a number of old building still standing in Carland.  There is an old General Store and Inn along the road.  I didn't see it, but there is an old school house that has been taken over by the growth somewhere.  (Field trip!)  And there is the Carland Elevator.  I can't find much information about the elevator, other than a lot of photos with the PM #1225.  But in my mind, elevators are not critical to the lumber business, so at some point there was a change if industry.
So here we are, waiting for the PM #1225.  These are two pieces of railroad maintenance equipment.  I can only guess, but looks like the front piece is a plow and the rear piece is a track rail maintenance machine.
As to the final image, yea its a bit saturated.  I like it.  In reality it is heavily weathered - dull.
The original Nikon JPG:


The day was supposed to be sunny, but....  It was really flat.  OK, I'll get out there again.  But until then I'm going with this image.  There are two things that have to be removed.  On the left, there is a man walking down the tracks.  Small detail, but must be done.  Bigger issue is the truck cab under the overhang on the right.  That took some work, but it is passable.  Replaced it with a bush.
But focus on the saturated maintenance machines.


ISO 1000, f/11, 1/200 sec, 22 mm
NIKON D500 Ver.1.15/18.0-200.0 mm f/3.5-5.6

I really like the detail in the blade of the front unit.  That has some character.  There has to be a bigger blade somewhere, right?  Michigan, snow.....
I'll be back to Carland sometime, looking for that school house.

PM #1225 Rolling By

From yesterday's "Chasing the Polar Express" adventure.  
This was an unexpected stop to catch the train.  Our group figured we'd never catch the train until it finished it's run.  Thankfully, we were wrong.
This image was taken where the RR crosses M57, just south of Ashley, MI.
For my first time in this environment, I'm OK with the results.  And I'm really happy with the 18-200 lens on the D500.
Next time, I'll position myself further away from the tracks, and use the longer lens for more framing options.
Here is the original, Nikon JPG:


As I don't use JPGs much, the settings on the camera are very average (bland).  I mostly use the JPGs for comparison, when I can.
And then this is why I shoot RAW.

ISO 1000, f/5.0, 1/2500 sec, 44 mm
NIKON D500 Ver.1.15/18.0-200.0 mm f/3.5-5.6

I recently changed my format to 1920 x 1080 to fit my monitors.  On this image, that format didn't work.  One of the most interesting parts of the image is the steam exhaust.  Again, next time.  Back to format, the 1920 x 1080 would not capture the entirety of the steam.  On the D500, the original size ration is 3:2.  So, I'm going with 1920 x 1280.  Gotta get it all.
The removal of the pole and wires was done with PS.  It did take some time and I'm not entirely happy with the upper right hand corner.  The wires on the left came out great.  I've become really happy with PS content aware fill improvements, but I should also try On One's process.
have figure this all out for next weekend's excursion.  No pressure.


Saturday, December 15, 2018

Rt 381 - A Different Look

I've always wanted to do a sketch effect on some of my images.  I seen some interesting combinations of PS layers and filters, but that doesn't do it for me for a few reasons.  First, in the end it doesn't look 'sketchy' and it way too much work.
In my search, I found this application that gives a 'paint' effect.  You like van Gogh - this will van Gogh your image.  You like the acrylic look - viola.
What I really like about this application is that it is not an overlay filter - it will reconstruct the image.  Fun to watch.
This is an image that I've used before of a section of road in PA, Rt 381 in fall.  I don't want to go overboard on this, just some difference.


I'm not in favor of the effect on definite subjects like trains, planes and automobiles.  Yet.  But for some landscapes - and some of the lighthouses, there are new possibilities.

Chasing the Polar Express - PM #1225

I missed the the steam locomotive era, where these behemoths roamed the rails.  I've seen some in museums, and yes some are large.  A large mass of metal and engineering sitting static is interesting - but moving would be great.  If there were an item on the bucket list which was to see a steam locomotive in motion, I can cross it off as of today.
The Pierre Marquette #1225 was built in 1942.  It is a standard gauge 2-8-4 Berkshire, weighing in at a svelte 442,500 pounds.  It is just under 102 feet long.
This particular locomotive was used by the Pierre Marquette Railway from late 1942 until it was retired in 1951.  For most of #1225's service life, it was used to move steel and wartime freight between Indiana steel mills and production sites in Michigan.  In 1957, the locomotive was donated to Michigan State University for engineering students to study.
While sitting as a static display at MSU, the future author of the Polar Express book who was attending MSU games as a child noticed the locomotive, and it became the inspiration for the engine in the story.  And in one of those little quirks of history, #1225 was the real number, no literary license for creativity was needed.
Over the years, a group of MSU students formed a club - and worked to restore the engine.  In 1975, fires were lit, steam was generated and the whistle blew.
In 1985, the engine moved from Lansing to Owasso, where it became the property of the Michigan State Trust for Railway Preservation, which is now going under the name of Stream Railroading Institute.
After passing a number of inspections, the engine is now used to haul passengers for pleasure in the mid-Michigan area.
Whew.
This year it ran a short run during the weekends called the Northern Express.  That run ends this weekend.  Then next weekend, it will run the Santa Express.  In talking with the yard volunteers, the difference is the Santa Express will have only vintage cars behind the locomotive.
I will be around there somewhere.
It is tough to get over how big these are.  For reference:


For further reference, that dude in the green is bigger than me.
Today was a field trip of sorts.  I was accompanied by two fellow members of the photo club I belong to.  Our goal was to get photos of the train - in motion.  We had a map of the route, and with some hustle we could get one of not more different locations during its trip.
I have photos from four locations that include the start and end with two in between.  I can not confirm or deny that the GPS voice was reminding me on multiple occasions what the posted speed was.
Our first stop was the village(?) of Carland.  This was probably the most interesting stop as there is an old grain storage building there, and if necessary would be a good back drop.  And as always, I'm not the first to ever have an original idea.  We had company.


I would see these same folks at multiple stops.  Some were a photo club from London, Ontario.  I could have made a few bucks selling coffee.  Strong coffee.
And as you can see, in Michigan the weather person calls this condition, sunny skies.
So, coming through Carland, Michigan - the PM #1225.


ISO 1000, f/6.3, 1/1000 sec, 120 mm
NIKON D500 Ver.1.15/18.0-200.0 mm f/3.5-5.6

Absolutely spectacular visual today.  I started out with I missed the steam locomotive era.  Which is true, wasn't around then.  But now there is a double meaning as I missed seeing these creations.

Wednesday, December 5, 2018

Big Bay Lighthouse in the Moonlight

In February of 2010, I took a trip up North.  Northwest of Marquette is the Big Bay Lighthouse.  When I got there, it was cold and windy.  February, northern Michigan and it's cold?  Who would guess?
But a day seeing a new lighthouse and not at work is a good day, right?
I was there in the early afternoon, but lots of cloud cover.  The wind was was working the water really well.  There is a lot of character in this shot.
I used this image one year for a Christmas card.
I needed a creative entry for the Club meeting.  Since this month's subject is winter, I've tried to keep the images cold.  I thought of this one, it has the potential to look, well cold.   But to be creative, I needed to add something.  Maybe add the Loch Ness monster added in the water would do it?  Creative, not fanciful.  


ISO 100, f/14, 1/100 sec, 18 mm
NIKON D80/18.0-105.0 mm f/3.5-5.6

I'm struggling a bit with the final light level.  It looks different in the PS viewer vs what is on the web.  I've had to lighten it a few times.  But this is where it is.  The creative part is adding the moon rays.  Interesting process.  Next step will be adding sun rays to an image, but this just wasn't the one.  There's always next month.

Tuesday, December 4, 2018

Cold Passage in B&W

For the club meeting this week, this month's subject is winter.  I already had two entries ready, one of the Tahquamenon Falls with a lot of ice and one of St. Joseph North Pier Light with a fair amount of snow and ice.  I was looking for a couple of winter shots that could be converted to for the monochrome category.   I found an interesting angle for the often photographed St. Joe's light.  Lots of good ice on the rail, and a different side of the walk way that I usually don't show.  The B&W angle is very interesting.


ISO 400, f/16, 1/200 sec, 31 mm
NIKON D90/18.0-200.0 mm f/3.5-5.6

Looking for the second entry in the category, I found some shots of a laker taken from the Mackinac side of the straights.  This was taken on a short trip up north in January 2015.  It looks cold.  Both shots look cold.
When I saw this image, I knew where I wanted to go.  Make it look historic.  I wanted to keep it mostly B&W, and not add any off coloring like I've used in the past.  I think this image can carry the load without any distractions.


ISO 400, f/9, 1/1600, 200 mm
NIKON D90/18.0-200.0 mm f/3.5-5.6

That just screams Great Lakes in the winter!
Actually both shots do.

Sunday, December 2, 2018

Crisp Point - 2009 (Again)

Back in the day, the Crisp Point Lighthouse was not easy to get to.  The road signs were mostly hand written.  I found it using some obscure directions found in a local lighthouse book.  The dirt roads at the time were not maintained in the winter.  And were not repaired in the summer.  But once you got there, it was Michigan beautiful.
I've been there a couple of times in the past few years, on an ATV.  The area is somewhat commercialized.  There is a new(er) souvenir building with modern rest rooms.  There are walkways around the area to aid in the reduction of erosion.  The improvements have been done very nicely, and to keep with the theme, very understated.
Back to 2009.  I was in the D80 phase of life.  Beginner.  Still feeling my way around.  How I have the RAW file for this still baffles me.  Back then, I knew what a RAW file was, but I really didn't know what a RAW file was - if you know what I mean.  If I remember correctly, I was bouncing back and forth between RAW and JPG or some combination.  I still have the D80.
From the XMP file, it looks like I was using a kit lens as well - no VR.  Was I ever that young?
In my folder for this image, I have many iterations.  I published this once before, in 2011 here.  Most of the images are heavily saturated.  The grunge period.  Other forms of Photomatix, when Photomatix was younger as well.
There are some photos that just stand the test of time.  There are few that I tend to return to over the years, to see if my tastes or software can make a noticeable change.  Two of these photos are the Rt 381 and Southwestern PA barn.  
This grunge image, looking at the XMP file was created in April of 2010.


Well, that will hurt your eyes.  Ha.  Looks like I had figured out how to get a signature block in the image as well.  Yep, that's mine.
So here is a current revisit.  Current software.  Current tastes.


ISO 400, f/10, 1/400 Sec, 18 mm
NIKON D80/18.0-135.0 mm f/3.5-5.6

Saturday, December 1, 2018

P51 Unlimited (Goldfinger) with.......

On the final day of the Air Races, prior to the championship Unlimited class race, there is a 'presentation' of the airplanes/racers.  All the crew get their photographs taken with the pilots and aircraft.  It is a production.


This is the crew of the #2 Goldfinger, a P51D out of Carson City, NV.
The P51s in the unlimited class are heavily modified.  Just sayn'.  Notice the colored tips on the end of the prop blades, you'll see them again.
While all these aircraft were just sitting there, engines started and set to idle maybe between 800 and 1000 RPM, if I can't get some form of prop blur here, it will never happen.  And although this was late in the day, the sun was left quarter and behind me.  Very few clouds.  Again, can't ask for better photographic conditions.
Fortunately this was the last race of the last day and I was pretty confident in my setup.
The Goldfinger is pretty much chromed out.  As a result, the blue sky reflections seem to be all over the airplane.  I was tempted to do a B&W version, and still may, but the overall colors are too good to mess with.  (Although on a really cold, crappy weekend, what about a B&W with the prop features in color?  That would get lifted for sure.)  
Anyway, after the crew photos and engine start I started taking photos at shutter priority, set at 1/80 second.  That put me at f/29.  That's rarefied air for me.  I get the best performance from my lenses f/5 to f/8 area.  I can go to f/11, but after that I start looking for other options.  And again, next year will be ND filters for me.  Damn those western sunny skies.
Anyway, back to the prop blur.  If I can't get it at 1/80 - again never will.  So here we are, sun shining on yellow tipped props and a stationary subject.


ISO 100, f/29, 1/80 Sec, 202 mm (Shutter Priority)
NIKON D7200 Ver.1.04/Nikon AF-P NIKKOR 70-300mm f/4.5-5.6E ED VR

This final image is heavily cropped.  I struggle with getting too tight on zoom and then wanting something more in the final edit - or like this have way too much uninteresting 'stuff' that has to get cropped out.  Guessed wrong here, but it passed the monitor test.
No editing the blur on this one.  Not necessary.  In flight however, 1/80th won't do.  But then again, the RPM will be closer to 3k.  That's doable, but I won't settle for f/29.  I'll never get a really good shot with that opening, or I should say I can always get a better, sharper shot.
Next year, next year, next year......  But for this shot - awesome!

The Christmas Cards are done,,,,,

The 2018 Christmas Card production phase is done.  The cards are now in the hands of the house public relations department.
The project was in trouble of a timely completion when the R1900 printer quit working last weekend.  Thanks to on-line shopping and cyber something sales, the replacement XP-15000 showed up mid week, was installed and card project is back on track.
I don't know how the caveman ever progressed out of his/her/its cave?  And I'm not sure how small stores will ever survive.
As when I bought the R1900, no one carries photographic printers locally.  Lots of big box stores were happy enough to order it for me.  Every option was two-three days away.  And if you're going to order it for me, why would I opt to have to drive to your store to pick it up?  As much as I don't like what Amazon is doing to small market America, I still use them.
First impression is the printer is really good.  It is not top of the line.  My printing needs don't require a $1K product.  If I need that sort of a one time result, I'll take it to a professional printing lab.  Being as it is not top of the line, when functioning it sounds plastic-y.  That's a technical term, right?  Anyway, the R1900 sounded solid, this new on not so much.  The other con is that the XP doesn't like stock paper through the rear feed.  Of the 35 cards I printed, I had to 'help' at least 30 initiate.  I've printed a few 4x6 images on regular photo paper through the rear feed without issue.  If stock paper feed is the only issue, I'm good.  
The image on the presentation paper is really good.  No runs, no drips, no errors.  Lots of technology improvements in the last eight years.  
I was happy with the ink consumption, or the lack of.  For the 35 cards and initial print head charge, it looks like just over 25% used.
The 4x6 test prints are good.  So far, I just printed at a standard level.  I'll probably rip off a larger print tomorrow with a higher quality setting.
The initial set up was easy.  One major difference for the ink cartridges was to not shake them up.  For the R1900, there was a written suggestion to shake the cartridge prior to install.  Not the case for the XP.  Sort of glad I looked at the instructions.  Apparently could have been very messy.
I did have an odd issue this morning when starting the card's project.  I would try to print from PS, and the program would end abruptly.  This wasn't in the plans.  This abend happened to any print I tried.  I removed all the Epson software for the R1900 and XP, and re-installed the new XP software, again.  It worked.
Looking forward to a long healthy relationship with this printer.